How it started and why it ended
When I started blogging, I was still in engineering school. And the world of websites and blogs was still new to me. So when I wanted to create a personal blog, I turned to what I thought was the best solution at the time: WordPress.
Like it or not, WordPress is quite easy to use for beginners, even more for me who was still discovering how to host a website at the time.
So, with a brand new OVH account, I was able to quickly setup my personal blog in a few clicks!
And when the time came where I wanted to create a blog dedicated to professional topics, I naturally came back to my ol’ friend WordPress.
But after some months, the glory of WordPress started to fade into a darker view. Sure, it was convenient to add a new post by going through WordPress’ UI, but maintaining the website was always boresome. Moreover, a WordPress installation requires using a database, which incurred a higher bill at the end of each month.
All of this for a blog that I knew did not receive many visits each day.

Surely there was a better way to do this.
The start of a new plan
I will tell you here the path that led me to the rebirth of my blog on which you are today. If you are only interested in the technical details, you can move on to the next section. Otherwise, happy reading!
Discovering Hugo
Before searching for a new tool, I tried to think of what I needed.
My blog was essentially a simple webpage, a static website with no fancy JavaScript or stuff like that. Plus, there was no backend to handle API calls for user authentication for example, so I could simply not use any database at all.
So what I needed was essentially a way to focus on the content of the blog, and make sure I could attach to it a nice theme, and that was it!
But, as I’m an engineer, so in essence, a real bad designer, I wanted to avoid having to deal with CSS as much as possible. Again, I wanted to focus on the content, rather than the looks. So I searched and searched for the perfect tool. And I didn’t had to look too long to find it: Hugo.

Upon arriving on its website, I was greeted by an intriguing message message: The world’s fastest framework for building websites. Surely, I was curious, and dug into the documentation. And oh boy, was I not disappointed.
This was exactly what I wanted. A framework where I had to write in markdown format, that would be converted to HTML for me. Plus, it came with a bunch of themes, so I didn’t even had to bother about the design. I could just pick one that I liked, and move on.
So, without losing any more time, I started to convert my WordPress blog to a Hugo site. I came across a handy script called wordpress-to-hugo-exporter that converted my whole Wordpress database into compatible markdown syntax, and I was ready to go!
Now I needed to host this website somewhere.
A new challenger: AWS
In parallel, I had an opportunity working for a company that focused on the Cloud, more specifically AWS.

At the time, Cloud was brand new to me. But I was hearing more and more about it, and I wanted to check what was all the fuss around it. Would this be a true life-changer, as people would call it, or would it be yet again another buzz word, and become a dying trend?
Long story short, AWS was (and still is) amazing! Not only was it an amazing discovery, I could simply not see a world without Cloud anymore.
The more I learned about all these amazing AWS services, the more I thought: isn’t there a way for me to leverage the Cloud to host my blog?
With that in mind, I started looking for options that AWS provided. And because of my recent discovery of Hugo, my website did not needed PHP anymore, nor any database to work. It was now a simple, static website, which could perfectly fit in an S3 bucket.
Not only does AWS has a documentation about hosting a static website on an S3 bucket, but the pricing for it was just a few cents.
I had found an easy and cost-effective way to host my website.
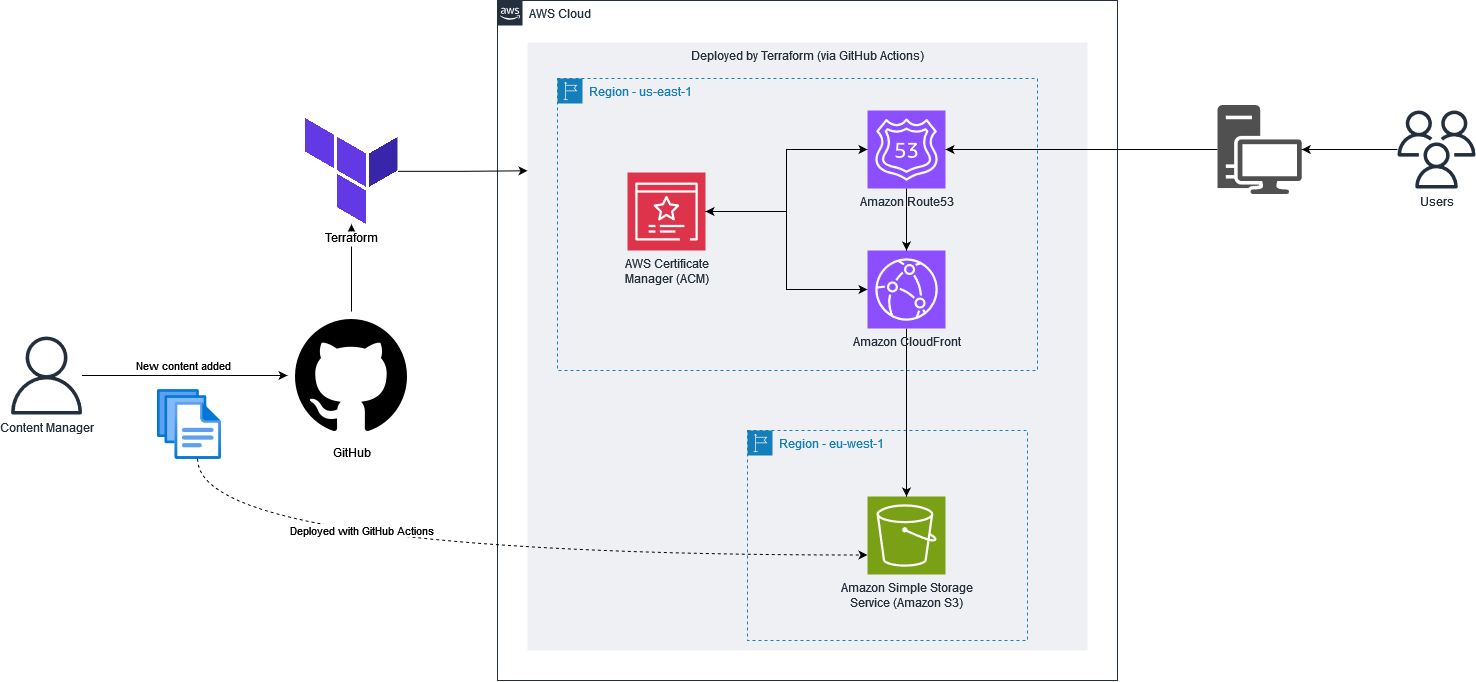
The last point that was bothering me, is that to setup all of this, I had to create an S3 bucket, configure it, add a CDN with AWS CloudFront, take into account certificates with AWS ACM, and finally create a DNS record in AWS Route53. So many actions that, if done manually, could make it super difficult to reproduce this setup if I had to do it again.
I needed a robust way to configure this infrastructure.
Terraform to the rescue
When you start learning Cloud, you will usually hear about Infrastructure as Code.
The idea is simple: describe your Cloud infrastructure with… code! (yes, as the name stands by).
The benefits of using an IaC tool, is that you will be able to keep track of the changes done on your infrastructure (like you would do with code in GitHub).
Now, let’s say that someone wants to update the configuration of an AWS service. This person goes to the AWS console and start making their changes. But after some trial and error, they decide to give up for now, and to go back to the initial state. And here is the problem: they don’t know exactly how it was before! And unless they took note of the initial state before making their changes, they will, again, have to do a bunch of trial and errors before going back to the beginning.
All of that could have been prevented if the infrastructure was configured through an IaC tool to begin with. In such a case, a simple automated deploy could have done the trick!
There are a bunch of IaC tools out there. But how can I not talk about the most popular one, the one that made IaC a standard in the Cloud ecosystem: Terraform.

Terraform, as you could have guessed, is an Infrastructure as Code tool with a declarative approach, meaning that you have to declare the state of the infrastructure you wish to deploy. To do that, you need ton use a specific language: hcl (which stands for HashiCorp Configuration Language). Here is an example to create an S3 bucket with Terraform.
|
|
Let’s go back to my blog! Terraform seems to be the perfect tool to configure the infrastructure that will host my blog. All I had to do was to go through an architecture step to know which AWS services I needed, and how to interconnect them, before translating that to Terraform.
And here is the architecture diagram I came up with.
All of this was perfect, but I realized one thing. Every time I needed to add a post, or update the infrastructure, I had to clone my repository, make the appropriate changes, and do a lot of manual actions to update my blog.
Let’s say that I was not too pleased with that, and I intended to fix that!
Forget copy and paste with GitHub Actions
Like I said before, my website was ready. The last step I needed was about the deployment.
For now, when I had to create a new post, I had to manually build my Hugo website, and move the generated files to my S3 bucket. What a waste of time and energy!
So I explored the topic of CI/CD pipelines to make my life easy (if you’re interested in this topic, I suggest reading my post about setting up a CI/CD strategy). While Jenkins tried to get my attention, I decided to go with the obvious choice: GitHub Actions.
GitHub Actions are simple CI/CD pipelines that you can define directly in your GitHub repository. The main benefit, is that you do not need any additional account, nor to install anything: all is included! In addition, GitHub Actions use an easy-to-read YAML syntax (in opposition to Jenkins and its horrifying groovy!).
So I created a pipeline that was able to configure Terraform in case I made any modifications, and could also build and deploy my website automatically in my S3 bucket when I updated or added a post.
All the steps were looking good, mission accomplished!
Technically: What I Have Today
My blog is now fully automated and deploys to AWS!
If you want to dive into it, everything is publicly available on my GitHub repository: https://github.com/antoinedelia/cloud-optimist
Now, let me show you more details about it.
Project Structure
The project structure is as follow:
|
|
As you can see, I split my project into three key directories:
.github: contains themain.ymlfile which defines the GitHub Actions CI/CD stepscloud: contains my Hugo blogterraform: contains all the Terraform infrastructure
The GitHub Actions
My GitHub Actions is rather simple, and can be divided into multiple steps.
The Initialization Step
Let’s have a look at the top of the file.
|
|
Here, I ask GitHub to run the pipeline on the master branch, or if I have a Pull Request. Let me reassure you, I do not deploy anything to production with a Pull Request. You’ll see below that this only allows me to perform some “dry-run” checks and ensure no issues are found before I can safely deploy to production via the master branch.
I also ask GitHub to use bash and to use the cloud directory as the default working directory.
Let’s see what’s next:
|
|
This step is crucial if you wish to fasten your CI/CD and ultimately save cost.
I’m using the dorny/paths-filter actions which allows me to detect which files were modified in the last commit. In my case, I look for the cloud and terraform directories. This way, if no changes were detected on the Terraform side, no need to trigger the Terraform steps in my pipeline. In the same way, if the directory cloud is untouched, no need to try to build and deploy the contents of my blog. This will save you few cents related to the data transfer pricing to your AWS S3 bucket (no need to thanks me!).
The next steps speak for themselves.
|
|
I simply get the content of my repository and update the submodules. This last step was useful back when I was using submodules to handle my Hugo themes. I now use the Hugo Modules, which could let me remove this step altogether.
The Terraform Step
Let’s continue with Terraform:
|
|
Now that’s a long step! Let’s break it down.
The first thing that should’ve catch your attention is this line:
|
|
Do you remember? This is what allows us to tell if files were updated in the terraform directory. Here, I check if I need to run these steps or not.
Then, I am running some ordinary Terraform commands: terraform init to initialize my project, terraform fmt -check to ensure my code is fancy, and finally terraform plan to look at the changes planned.
Last but not least, terraform apply -auto-approve, which will deploy the changes to my AWS infrastructure. But if you look closely, you will notice I added two extra checks:
|
|
This ensures that this step will only be ran if the event is a push on the master branch. This way, no need to worry about an unwanted deployment when I simply play with my infrastructure on another branch or in a Pull Request. Phew!
The Hugo and AWS Steps
Now that my infrastructure is ready, it is time to publish my blog!
|
|
As for Terraform, we check if any modifications were done on the blog.
|
|
Then, I’m retrieving an extended version of Hugo straight from the GitHub release (here the v0.142.0). I’m installing it and build my blog using the hugo command.
This step could be simplified using the peaceiris/actions-hugo actions
Finally, I’m using the jakejarvis/s3-sync-action actions (I realized while writing this post that this action has been archived a couple of days before, ouch! – I’ll add an edit later to mention an alternative) to move my blog’s files into my S3 bucket.
Of course, you’ll have to store some credentials in your GitHub repository so that your GitHub Actions can be authorized to use AWS, but nothing too crazy.
We are now done with the GitHub Actions part!
The Terraform part
Regarding Terraform, I’ll keep it short, as this is not too complex.
There is one personal choice here, is that I prefer to split my .tf files based on the AWS services used, rather than putting them all in a single main.tf file, which could make it hard to read. In the end, I have an s3.tf file for all resources linked to the S3 service, a cloudfront.tf file for everything related to CloudFront, and so on.
One important information, is that it is necessary to define at least the us-east-1 region, as you must deploy your ACM certificates there. For the rest, I’m deploying all my resources in the eu-west-1 region. To make this split, I’m using the Terraform alias. Here’s an example:
|
|
The Hugo part
My Hugo blog is based on the Stack theme. There is also a GitHub template available which allows you to quickly setup your own blog based on this theme.
Not a lot to say about this part, except that I encourage you to have a look at the Hugo Modules, which will save you from having to deal with submodules (and will make it easier when you need to update your theme).
Potential Improvements
While I’m extremely satisfied with the end results, I noted a few points that could be improved in the future.
First off, I saw that Hugo has a deploy command that could, well, deploy your blog directly to an S3 bucket. Perfect! So I need to learn a bit more about Hugo Deploy.
Finally, even though using AWS as my hosting platform is not expensive (less than 2$ a month), it is not free. But it would be completely possible to use GitHub Pages to make this blog accessible, while taking the advantage of GitHub as the hosting platform (on this point, I’m a bit reluctant, as then I would not be able to show-off with my beautifully made AWS diagrams…).
Conclusion
Here we are, you know everything!
From my beginnings with WordPress, which, while being useful, showed some weaknesses on the backup, maintainability and deployment part.
Of my research to find the perfect technical suite: AWS, Terraform, Hugo and GitHub Actions, all of that to enable a speedy deployment at almost no cost!
When I look back to my previous setup and compare to what I have today, I am so happy to have done the switch!
Now, it’s up to you! You have all the information to create your own blog and deploy all of this with a breeze!
Happy blogging !