Introduction
If you’re juggling multiple AWS accounts, or even just a single account with different users, you know that access management can quickly become a real headache. Creating individual IAM users in every account, managing their permissions, ensuring everyone is using MFA… Phew, just thinking about it is enough to give you cold sweats! But what if I told you there is an elegant, centralized, and much more secure solution to handle all of this? Ladies and Gentlemen, let me introduce you to IAM Identity Center!
Ever since I discovered and implemented IAM Identity Center (which some of you might know by its former name, AWS Single Sign-On or AWS SSO), my life as a Cloud admin has changed radically. It’s the kind of tool that, once adopted, makes you wonder how you ever lived without it.
So, what is it exactly, and why is it so great? Let’s find out together.
IAM Identity Center: What’s the Deal?
Simply put, IAM Identity Center is an AWS service that allows you to centrally manage access to all your AWS accounts and Cloud applications. Whether you have a handful of accounts or a sprawling AWS organization with dozens, or even hundreds of accounts, IAM Identity Center is there to simplify the task for you.
It offers a single point of entry (a web access portal) for your users, allowing them to access the roles and accounts they are entitled to, all with a single authentication.
The Benefits of IAM Identity Center
If I sound enthusiastic, it’s because the benefits are numerous and significant. To name the most important ones:
- Single Sign-On (SSO): Your users log in once via the AWS portal (or via your existing identity provider if you have one) and then access all the accounts and roles assigned to them, without having to re-authenticate for every single account.
- Centralized Management: You manage all your users, groups, and their permissions (via “Permission Sets”) from a single place, even if they need to access dozens of different AWS accounts.
- Temporary Credentials: This is one of the most important points! When users access an account via IAM Identity Center, they obtain temporary credentials with a limited lifespan. Say goodbye to lingering IAM Access Keys that pose a major security risk.
- MFA (Multi-Factor Authentication): You can (and should!) enforce the use of MFA directly at the IAM Identity Center login level.
If I’ve piqued your curiosity and you want to know more, check out the AWS documentation on IAM Identity Center. For those who are already sold, let’s continue!
Getting Started with IAM Identity Center
Setting up IAM Identity Center is surprisingly simple, especially if you use the built-in Identity Center directory as your identity source. Here are the key steps to get started:
- Initial Configuration: Head to the AWS console and search for “IAM Identity Center”. Heads up: choose your AWS region carefully to host IAM Identity Center right from the start, as it is currently complex to change the IAM Identity Center region once configured. The initial setup is often guided and quick. You will choose your identity source (the Identity Center directory, AWS Managed Microsoft AD, or an external provider).
- Creating Groups and Users: Define groups relevant to your organization (e.g., Developers, Administrators, …). Then create your users and assign them to these groups. If you are using an external IdP, this step will consist of synchronizing your existing users and groups instead.
- Creating “Permission Sets”: A Permission Set is a collection of permissions (similar to an IAM policy) that you can reuse. You can start from AWS-managed policies (e.g., AdministratorAccess, ReadOnlyAccess) or create your own.
- Assigning Access: This is where the magic happens. You assign a group (or a user) to one or more AWS accounts, giving them the right to use a specific Permission Set on those accounts. For example, the Developers group might have the
PowerUserAccessPermission Set on the development AWS accounts. - Enforcing MFA: In the IAM Identity Center settings, configure MFA to be mandatory for all your users.
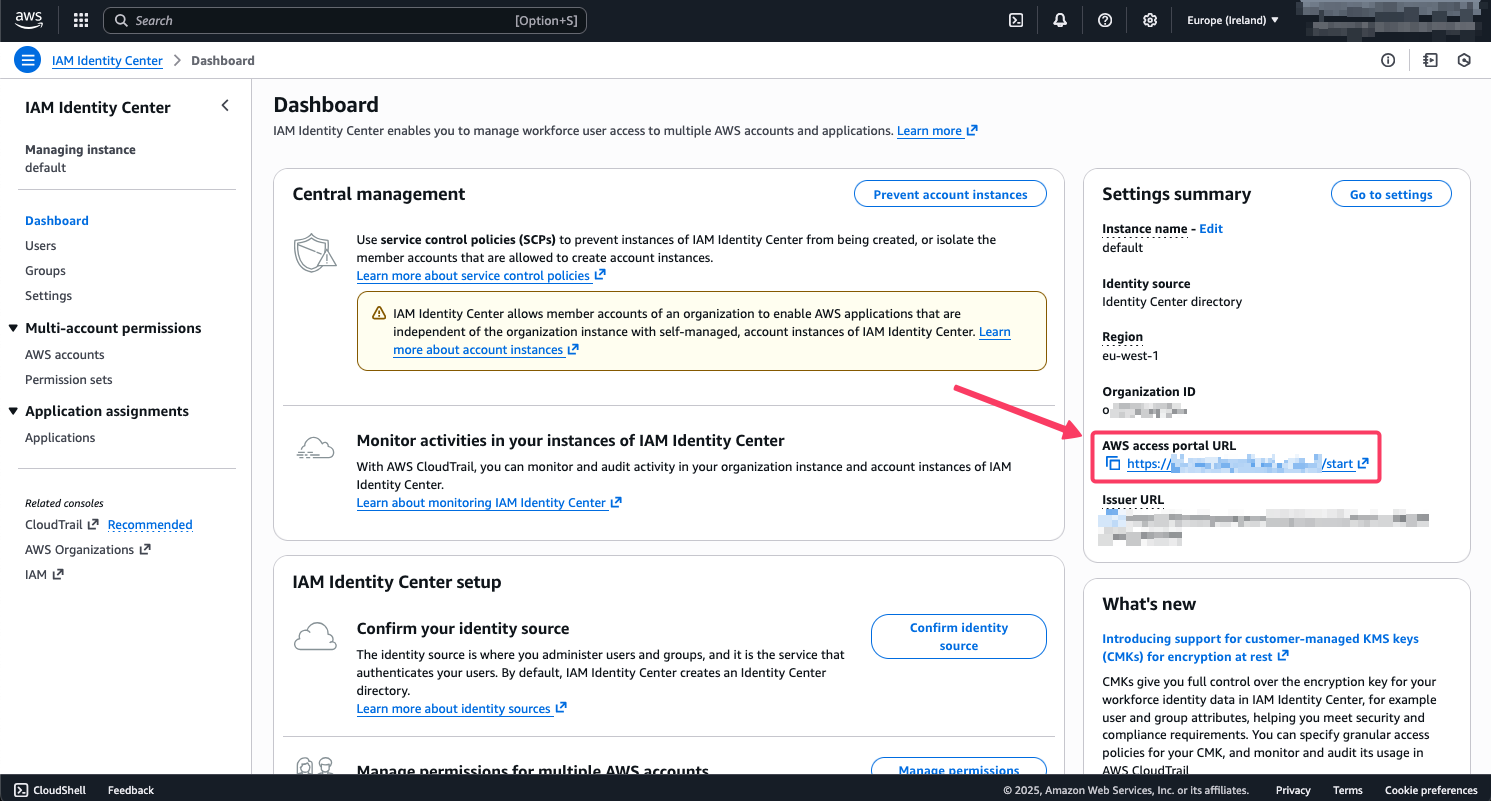
- Sharing the AWS Access URL: Every IAM Identity Center configuration has a unique URL for the access portal (e.g.,
d-xxxxxxxxxx.awsapps.com/start). This is the URL your users will bookmark to log in.
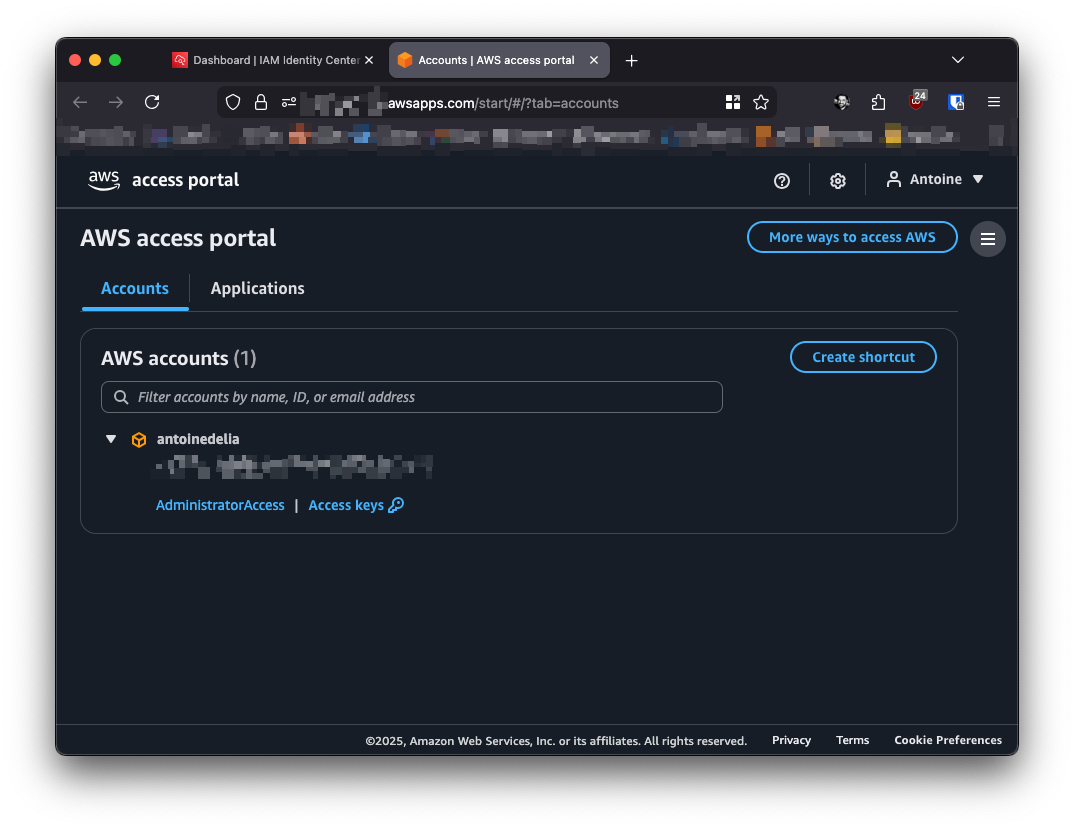
Once logged into the portal, users will see the list of AWS accounts and roles (defined by the Permission Sets) they have access to. One click, and they are in the console of the chosen AWS account with the right permissions!
They can also get temporary credentials for the CLI. But speaking of which, how do you connect to an AWS account via CLI using IAM Identity Center? Let’s check it out!
Configuring CLI Access
The AWS documentation for configuring CLI authentication with IAM Identity Center is pretty clear, but I’ll walk you through the steps anyway. I’m assuming you already have your AWS CLI installed.
The first and only command to run will be the following:
|
|
Next, you will need to enter some information specific to your IAM Identity Center. The most important being the “SSO start URL” (which you can find in IAM Identity Center under the name “AWS access portal URL”, a URL ending in /start). You then need to enter the region where your configuration is located; as for the “SSO registration scopes”, you can leave the default value.
|
|
If everything goes well, a window should open in your browser to validate your identity. Once that’s done, head back to your terminal.
In my case, I only have one AWS account, and IAM Identity Center selects it for me by default. But you might have a choice of which AWS account to select. The same goes for the role.
Finally, choose a profile name to use for your future API calls. I advise you to use default, which will allow you to avoid adding --profile my-aws-profile to the end of every command.
|
|
And there you go, you’re all set!
Conclusion
As you might have gathered, I am a big fan of AWS IAM Identity Center. It brings an indispensable layer of security while considerably simplifying access management, whether for administrators or users.
It is a true pillar for a well-managed and secure AWS infrastructure. If you aren’t using it yet, I strongly encourage you to explore setting it up. It’s a minimal time investment for huge gains in security and efficiency.
Your infrastructure (and your security teams) will thank you!